Saturday, December 29, 2012

Progress photos - bathrooms and laundry room

All of the countertops have been installed and they look great!  You might remember my trip to the slab yard where I found a great remnant of Pental's 3cm Alpine quartz.  Here it is installed in the powder room:
 
Pental's 3cm Alpine quartz
 In order to stay on budget with our hard surfaces, we decided to use laminate in the mud room and the laundry room.  Here's a picture of Formica's Sand Crystal Laminate countertop in horrible lighting:
Formica's Sand Crystal Laminate 3517-46
 The guest bath is one of my favorite rooms in the house.  We used a knotty alder cabinet with a burnished walnut stain.  The counters are Pental's Seashell Polished and the backsplash is a row of two 3x6 inch Pental subway tile.  Paint color is Stratton Blue by Benjamin Moore.  Sinks are undermounted, by Kohler:
Pental Seashell Polished Quartz with Benjamin Moore HC-142 Stratton Blue
 The laundry room is another place where we were able to save some money.  We ended up installing melamine cabinets and WilsonArt Calcutta Marble laminate counters. 
WilsonArt Calcutta Marble laminate counters 4925K-07

Built in sewing counter

Laundry room sink
 Our master bathroom continues to come together with the marble slab installed on the dual vanity, tub and shower bench. 
sTile Tabula Moka floor with Pental's 4x12 inch Urban Life Subway tile in white gloss

3cm Carrara marble slab on the tub

The slab carries into the master shower bench
 One of the things that we've focused on in designing our house is maximizing the potential for storage.  We asked our cabinet maker to build a hutch that would sit on top of the dual vanity.  We figured this would be an ideal place to store things that usually end up sitting out on the countertops.  Eventually, the hutch will be trimmed out with a piece of crown molding on the top.
Dual vanity with 3cm Carrara marble slab and built in hutch

Progress photos - kitchen counters and sinks

The hard surfaces (counters and tile) are installed in the kitchen.  Here are some pictures!
Looking at the kitchen from the great room

Large kitchen island with plenty of storage
 You may remember that I was dying to have a prep sink if the budget allowed.  As you can see, we picked a cast iron Kohler undermount sink that is now sitting in the kitchen island.  The white subway tile on the back wall is a 3x6 inch matte tile from Pental.  The empty space in the cabinetry is where the wall microwave and oven will sit.  The door to the left of the microwave/oven cut out is a small, but functional walk in pantry.
Pental Riverbank Brushed quartz with Pental 3x6 inch matte subway tile in the background

A closer look at Pental's Riverbank Brushed Quartz

Double basin Kohler cast iron undermount kitchen sink
 One of the "problems" that occurred when finishing the tile in the kitchen is pictured below.  You'll notice that there's a large panel where the light switch was placed.  Since the light switch panel extends beyond the countertop, we had trouble figuring out how and where to stop the tile.  I suggested that we bring it all the way to the millwork on the sliding glass door and my brilliant husband suggested that we bring it all the way down to the floor.  This is a great example of how you can turn a mistake into something beautiful.  I would've never even thought about running the tile down to the floor, but now that it's in, I really love the way that it looks. 
Subway tile extending down to the floor

Quartz countertop with subway tile backsplash

This is where the 5 burner gas range and vent hood will sit
 You might remember that I've been obsessed with this Rohl bridge faucet.  I ended up taking the plunge and we had our plumber order it up.  This is one of the most expensive fixtures in the house, but I figured that it was one worth splurging on.  Not only will I use this faucet every single day, but the high arc extends nicely over the kitchen sink, preventing excess splashing.
The Rohl bridge faucet that I've been lusting over for the past year - approximate retail value: $1,100


Design Inspiration - great room fireplace

One of my favorite pieces in our house is the great room mantle and fireplace.  Since we've stuck with such a crisp, clean look throughout the house, I wanted to add something rustic and organic.  We have quite a few pieces of antique furniture that are just that - rustic, organic, dovetail construction, leaded glass and show the wear and tear of time. 
 
When thinking about what we wanted for our fireplace, we knew that we wanted to use a piece of timber with some sort of character.  When I stumbled this picture from The Lettered Cottage, I knew that I had found something special.  Layla and Kevin, bloggers from The Lettered Cottage had installed a beautiful piece of wood over their fireplace, achieving the exact look that I was going for. 


Timber mantle from The Lettered Cottage
Living in the Pacific Northwest, we're fortunate to have lots of local timber, both old and new. If you've ever Googled "reclaimed lumber," you'll find a slew of information and products available. Problem being, anything with the label "reclaimed" comes with a hefty pricetag. I looked at a local salvage store and found reclaimed timbers from an old warehouse in downtown Seattle with the total price for the timber (after being milled and finished) coming in at $700. That's just the piece of wood itself and did not include the installation.  A little tip: most timbers are priced per Board Foot, so bring your calculator if you're going shopping for a piece of wood! 
I also looked at Pacific Northwest Timbers, and found some really cool pieces. Some of their timbers are ocean salvage, that fell off a ship at the turn of the century. This sort of history makes my heart skip a beat, but the price made me want to puke. If money were of no object, I would've absolutely sprung for an ocean salvage timber, given my affinity for all things coastal.
 
I also cruised EBay and found a beautiful piece of wood from an old distillery and tobacco farm in Kentucky.  Given that I did a brief stint in the South when I was growing up, and am slightly obsessed with all things "still," this would've been a great option if it weren't so expensive.  Again, the "reclaimed" label came with a price. 
 
In the end, our amazing finish carpenter told us that finish carpentry is something that just pays the bills.  His real passion, as a second generation woodworker, is making furniture by hand.  When he mentioned that he had a timber sitting in his yard under a tarp, I figured that he might have a cost effective solution to our little problem of finding a beautiful timber mantle.  I provided him with a sample of our flooring and he went to work in his shop.  Here's what we ended up with: a beautiful finished timber, custom made, stained to match our floor, and varnished, installed for $700. 

Timber mantle before installation with the bracket on the back


Timber mantle with lots of variations in the wood - look closely and you'll see various knots & bug holes

After installation - the rest of the mantle will be finished in white, shaker style panels that mirror the cabinetry

A shot from afar of the timber mantle installed
What I like most about the mantle is that I know the story behind it and where it came from.  While it's not reclaimed, it's handmade by someone with talent and character - that to me, is priceless!

Monday, December 10, 2012

Progress photos - tile work & master bathroom slab


Most of the tile has been installed in the master and guest baths, and both rooms look gorgeous! 
 
Here's a recap of the rooms so far:
 
Master Bath
Master bath floor: sTile Tabula Moka porcelain tiles, brick set
Master bath floor grout: Laticrete Spectralock grout #90 Light Pewter
Master bath shower: Pental Urban Life 4x12 subway tiles, brick set
Master shower grout: Laticrete Spectralock grout #44 Bright White
Master bath slab tub deck and dual vanity countertop: 3cm polished Carrara marble slab
Master bath paint color: Benjamin Moore #1551 La Paloma Gray


Wondering what the red stuff is: RedGard waterproofing membrane applied over the Wonderboard

sTile Tabula Moka

sTile Tabula Moka tile with Laticrete Spectralock #90 Light Pewter grout


sTile Tabula Moka tile, Laticrete Spectralock #90 Light Pewter grout, and Benjamin Moore's #1551 La Paloma Gray on the walls

Installation of the Pental Urban Life 4x12 white gloss ceramic tiles

Master shower is almost done.  The bench (in red) will be Carrara marble slab.  Two shower heads: one sticking out of the left wall and the other is a rain head coming out of the ceiling.

Built in shampoo shelf with gently sloped bottom edge to prevent standing water - this was all included in our tile bid

Bullnose tile to finish the edge of the shower walls

Pental Rondec Schluter strip in bright white - this small PVC piece will line in the top edge of the tub backsplash, since we weren't able to find a tile with the bullnose on the 12" edge
 
It's no secret that I've been incredibly involved throughout the entire process of building this house.  One of the things that I wanted to see was where and how the slabs were fabricated.  My Dad and I headed up north to the slab yard where our countertops are being fabricated.  It was there that we met the most crazy, hilarious Polish dude.  He walked us through the shop, showing us the templates for our counters.  I never realized that the templates were just "sticks" that were held together with hot glue.  They're then etched on the actual stone and cut with a giant saw.  
These frames are the templates for our kitchen and bath counters.

The crane that lifts the slabs.  It's actually sort of freaky to see a beautiful slab dangling from that little clip.

Slab saw
Half of of the master tub top - 3cm Carrara marble

If you look closely, you can see the template for the master tub

Guest bath
Flooring: Daltile Octagon and Dot in matte white
Flooring grout: Laticrete Spectralock #44 Bright White
Cabinets: knotty alder stained
Countertops: Pental quartz 3cm Seashell Polished
Paint color: Benjamin Moore's HC-142 Stratton Blue on the wall. 
Daltile Octagon and Dot matte white tile floor, before grout application

Dailtile Octagon and Dot matte white floor tile with Laticrete Spectralock #44 Bright White grout

One of the great things about paying a visit to the slab yard was that I was able to find a remnant for our powder room.  Here's the slab that we'll be using for the small, single vanity downstairs:

3cm Pental polished "Alpine" quartz
Our countertops are currently being fabricated and I can't wait to see what they look like once they're installed!   

Saturday, December 8, 2012

Progress photos - millwork & doors

It's been a while since I've updated the blog, and our finish carpenters have been hard at work.  So far they've hung the interior doors, wrapped the doors, wrapped the windows, started on the stairs and completed most of our two fireplaces. 

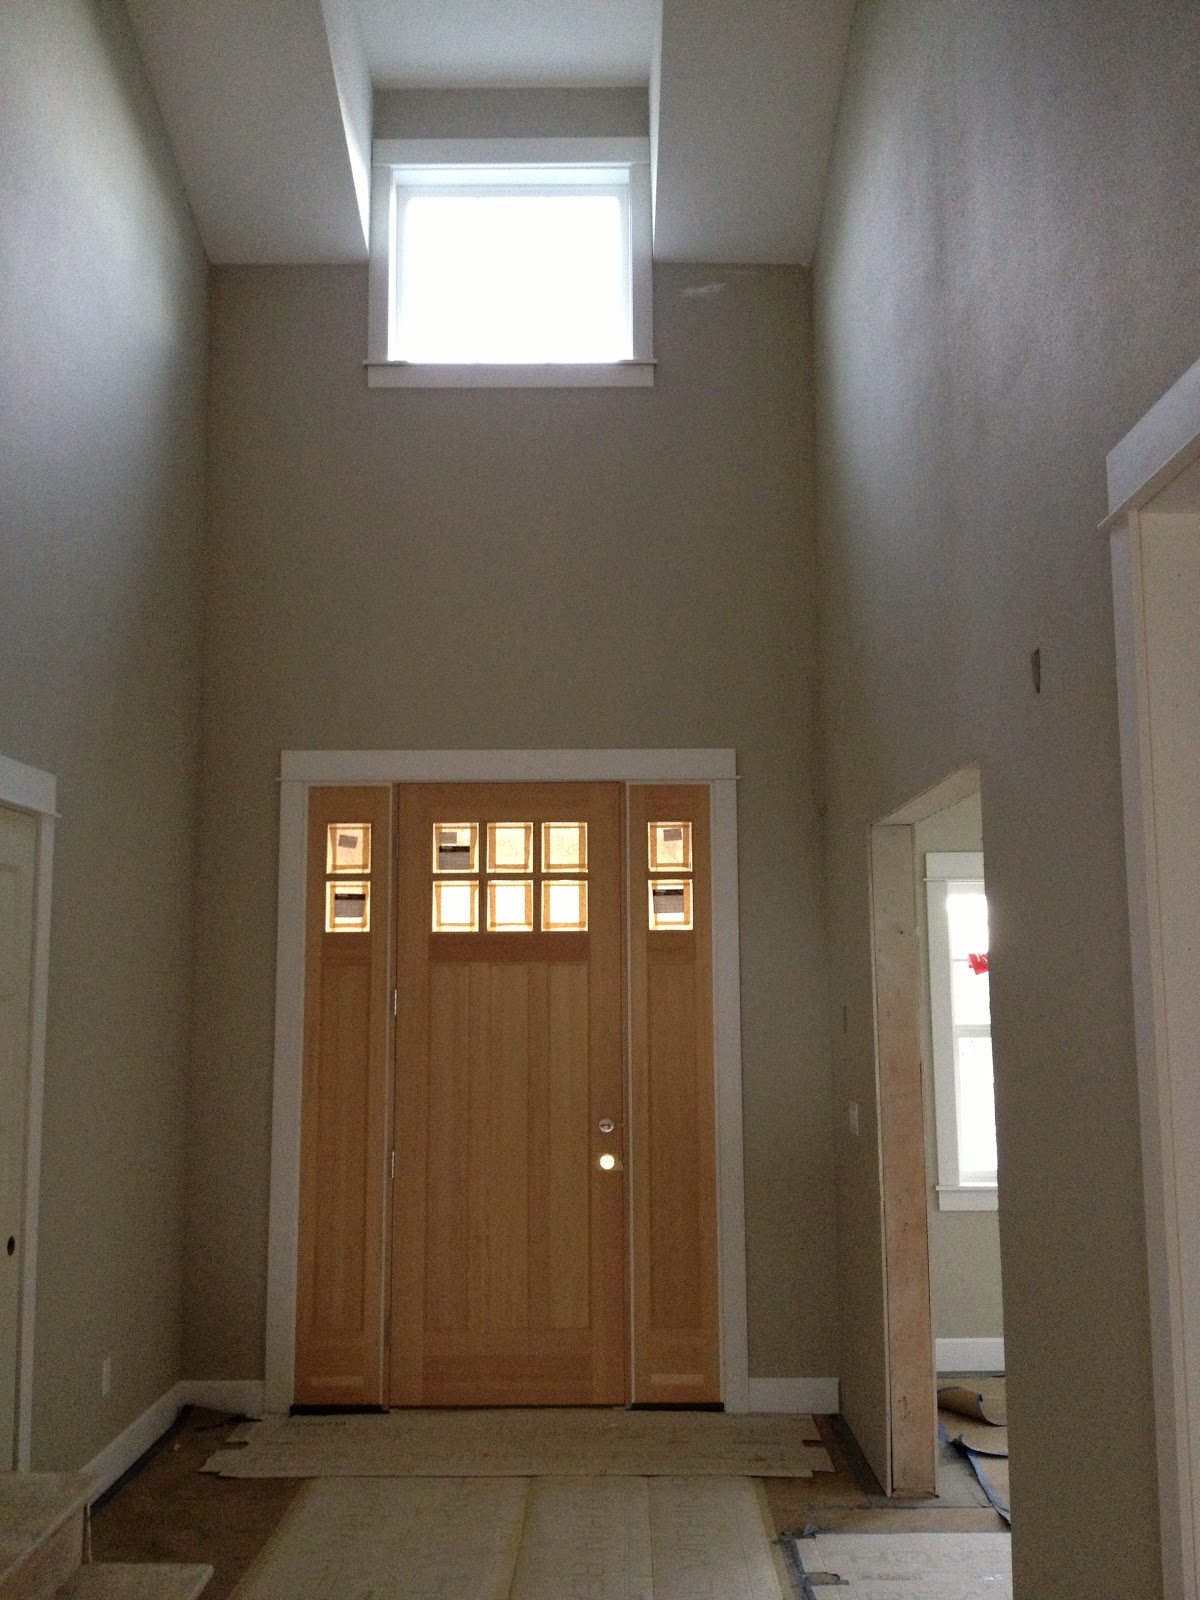
Our front door is an 8 foot, solid wood door.  The lights on the door and the large light at the top of the foyer allow for lots of natural lighting, coming in from the west.  Eventually, the inside of the door will be painted Sherwin Williams Alabaster.  While I do love the natural color of the door, it clashes way too much with the dark floors that are underneath all of that protective cardboard.  Don't stress, dear readers!  The exterior of the door will remain the beautiful, natural hue.

Simpson front door from the inside
 For our interior doors, we ended up using the CraftMaster Conmore 5 panel door.  This is a molded door, which fit well within our budget.  I have to be honest and say that I was concerned that the doors would feel light and cheap, but I've been incredibly surprised with the weight and quality of the doors.  The color that you see in the picture is the primed factory color.  All interior doors will be painted Sherwin Williams Alabaster.
CraftMaster Conmore 5 panel door

CraftMaster Conmore 5 panel door
 When considering the style of doors to open into our office, we knew that we wanted to go with a glass panel door.  We ended up using a wood 2x3 glass paneled door from Simpson.  If you're searching for doors with glass panels, there are a wide variety of styles.  We wanted to keep the style pretty simple, and ended up using a 6 panel instead of an 8 panel, which would have had more lines through the door.
Simpson 6 panel glass office door

Simpson 6 panel glass office door
 We decided to do a very simple wrap on all of our windows.  Our finish carpenters have been amazing.  They're incredibly knowledgeable, hardworking guys and are able to bring our visions for the overall aesthetic to life.  Per the suggestion of our carpenter, we did a simple wrap around the windows with a bead at the top and a sill to match.  I think they turned out beautifully!
Simple MDF window wrap
 The circular windows proved to be a challenge to wrap.  It's my understanding that you can go about this 2 ways: purchase a premade custom wrap that fits the window -or- use 1/18" sheets of MDF to line and wrap the window.  We went with the latter, purely based on the lower cost. 
Circle window trim
 Our stairs are coming together beautifully, and have proven to be the most challenging task for our carpenter.  Obviously when you think about how so many things have to line up perfectly, this is no easy task.  He's spent the last week measuring, calculating and putting up the box newels and balusters.

One of the considerations in choosing the false treads (the pieces of dark wood that cap the edge of the stairs) is cost.  If you've been reading this blog for a while, you may remember that we picked a stained maple wood floor.  According to our millwork supplier, the maple false treads were significantly more expensive than oak.  While oak is a bit more knotty, we decided that it was probably worth the cost savings to use an oak false tread and an oak handrail.  Overall, we're really happy with how they turned out, and the knots are a bit less visible than we had imagined, as they were stained to match the dark color of the floor.
Looking towards the open railing of the basement

Box newels, false treads and white risers

Placing the box newel in the corner

Stained oak false treads

Stained oak railings and white balusters - 2 per step
 When trying to figure out how we would trim up the side of the master bath, we had two options: MDF and wood.  While wood is a more expensive option, our carpenter cautiously steered us away from using MDF, due to the swelling and expansion that occurs when MDF comes into contact with water.  We didn't end up using a lost of wood, since the face of the tub isn't that large, so it wasn't a budget breaker to use real wood.  You'll notice that the face of the tub mirrors the Shaker style cabinets throughout the house.
Wood paneling on the front of the tub deck
 The carpenter's helper, who is a cabinet and furniture maker by trade offered to help us with the solid wood beam that we had imagined over the fireplace.  Since he mills his own wood, he used a timber that he had at his home to create the perfect rustic beam.  I'll be doing a separate post on the great room fireplace, because it's one of the things that I'm looking forward to the most, but here's a sneak peak.  There are lots of knots, variations and even bug holes in the wood that give it beautiful history and character. 

While I loved the idea of using a piece of reclaimed wood, the average raw timber was around $700 before being cleaned, milled and finished.  I looked at everything from timbers hauled out of the Pacific, to an old piece of wood from a tobacco barn in Kentucky.  Our total cost for this custom beam after cleaning, milling, finishing, varnish and installation was $700.  A price that can't be beat!  It also comes from our very eccentric, 1961 van driving, telemark skiing carpenter - and that to me, is priceless!
Custom solid wood beam for over the great room fireplace

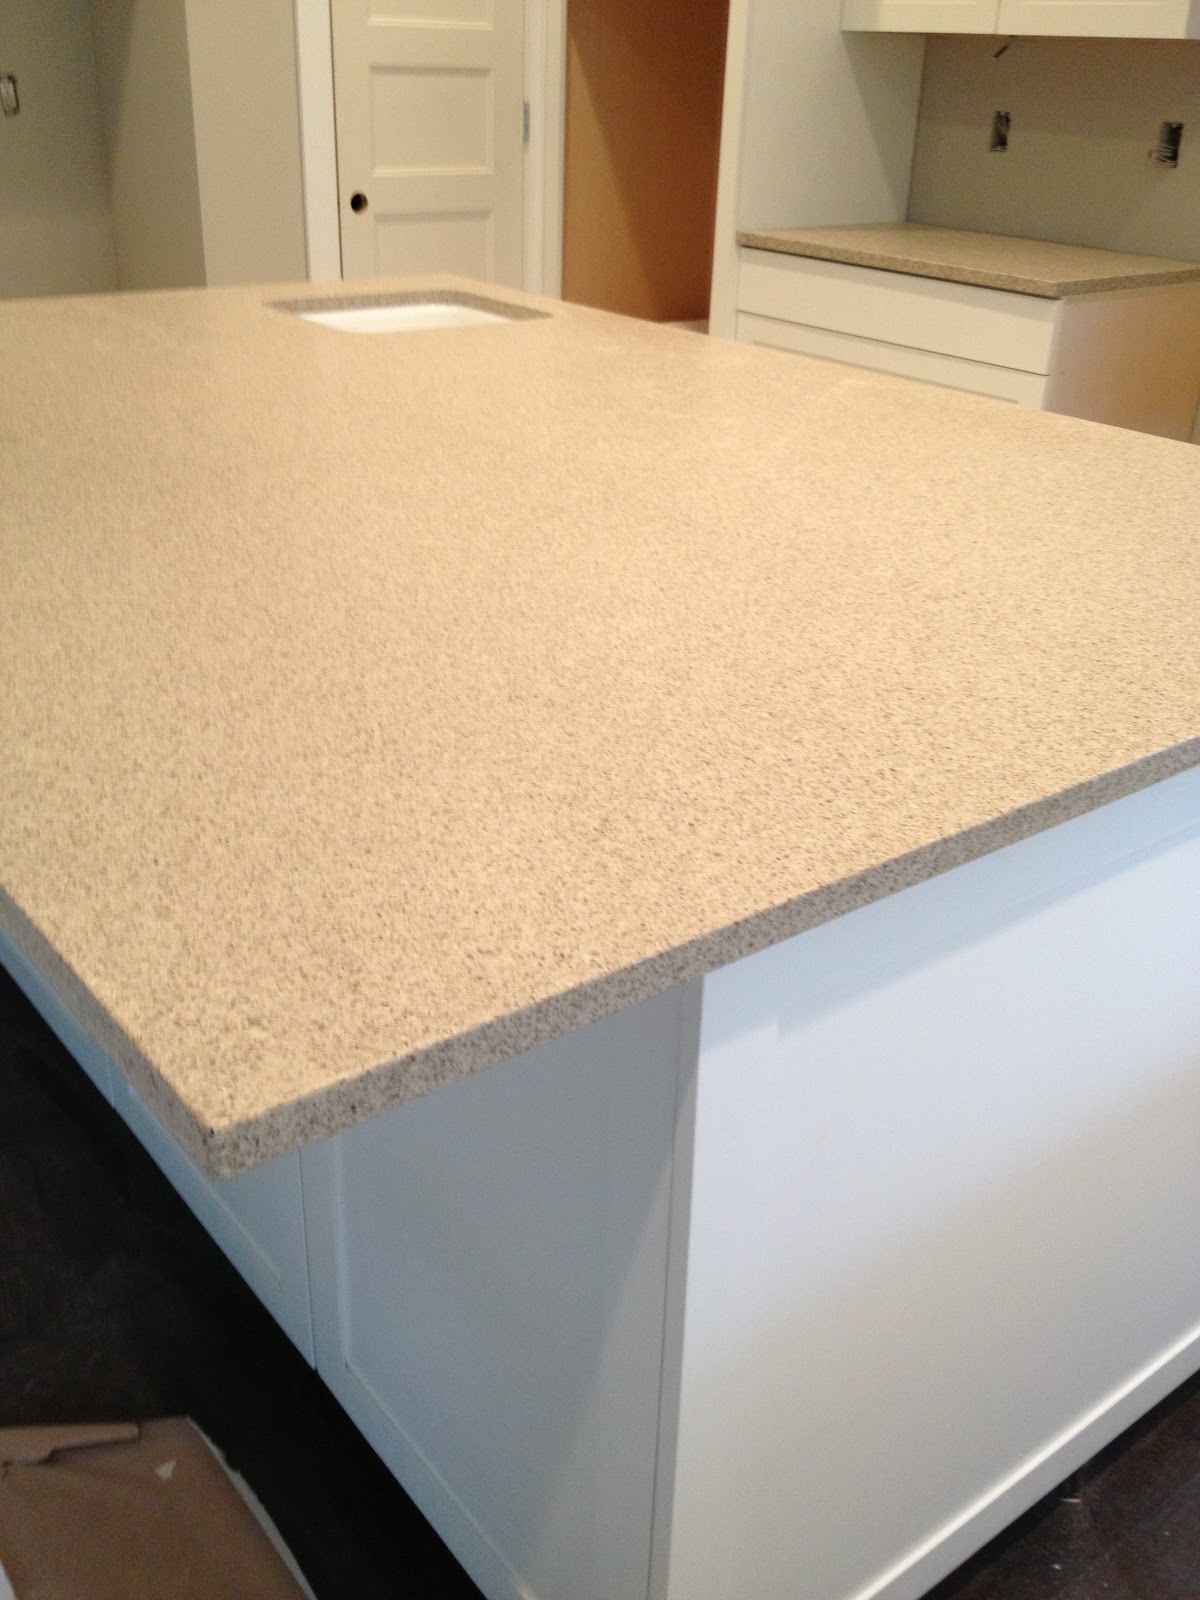
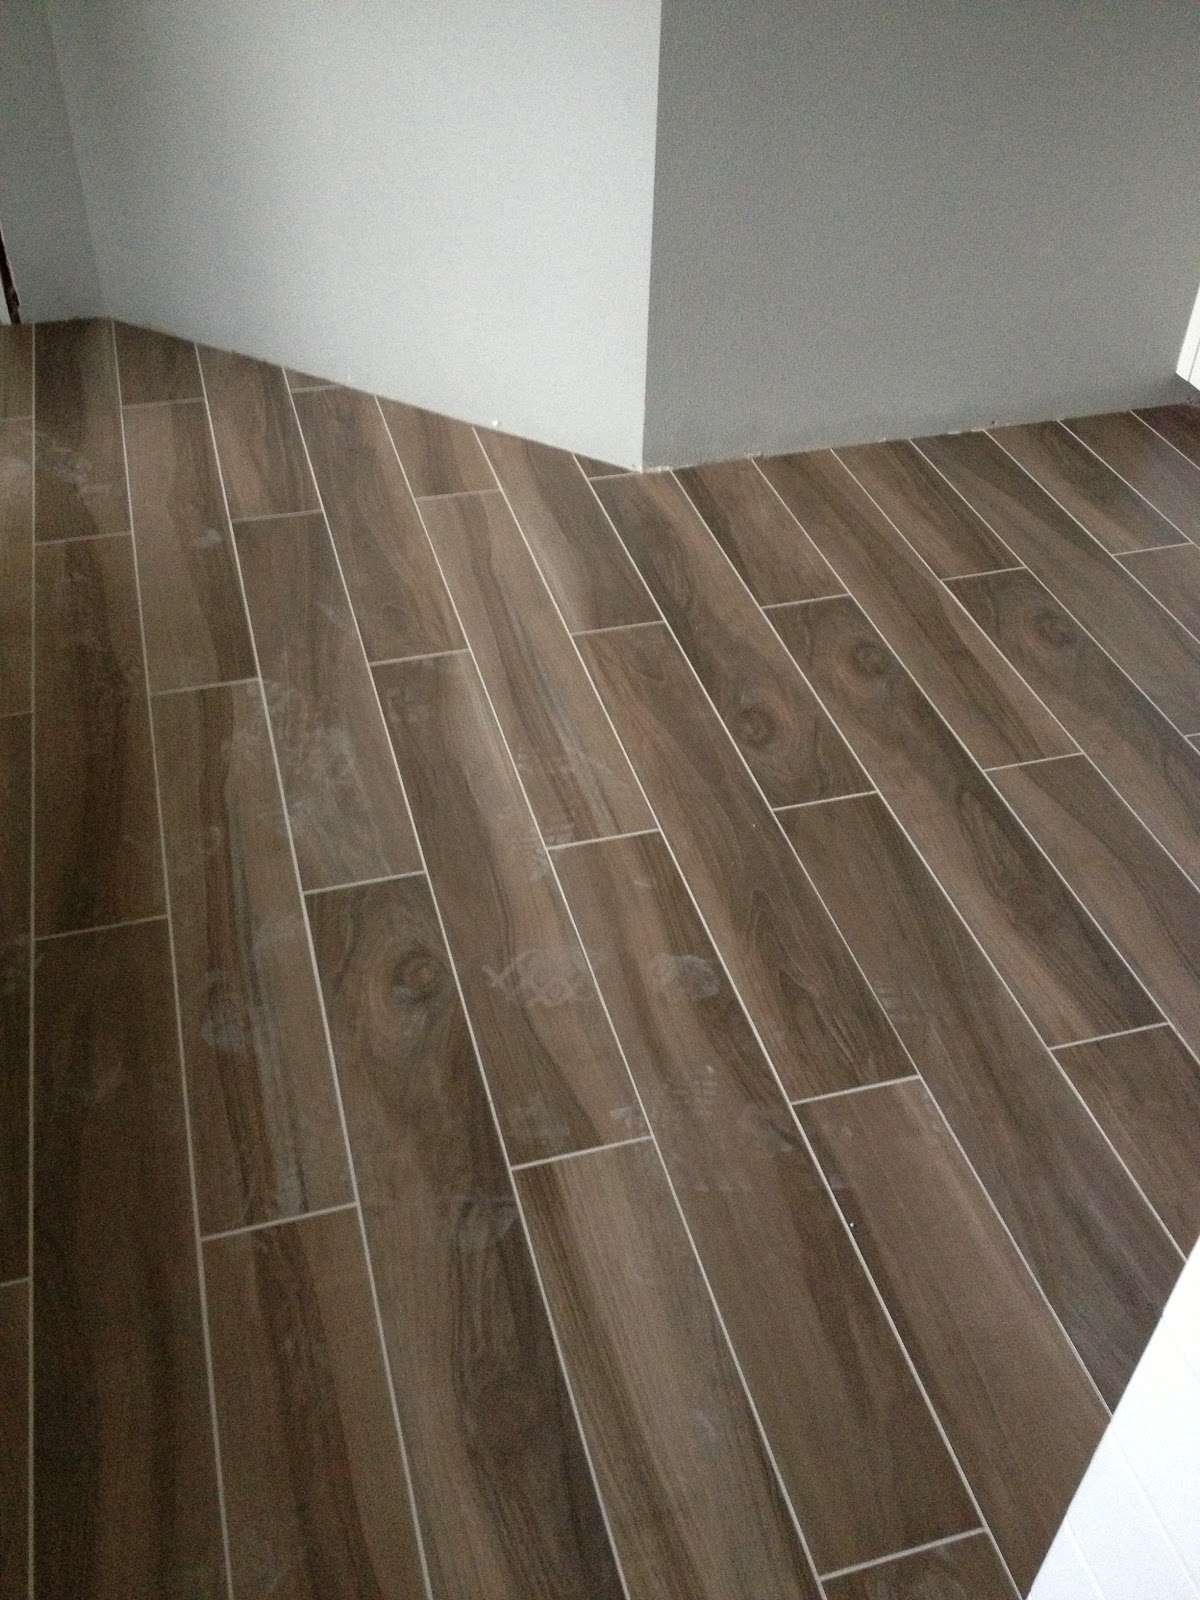
I have quite a bit of catching up to do, so my next few posts will be focusing on: tiling, countertops/hard surfaces and exterior paint.