I'm a bit under the weather and have caught the crud from our resident young Petri dish. I'll be back next week with another post about our breakup with the builder, and some updated recommendations and revisions on selecting a builder.
I also have some things that I would do differently and things that I would keep exactly the same, along with some product reviews headed your way.
As always, thanks for reading - I'll be back!
Monday, April 1, 2013
"Houston, we have a problem" - the basement flooded
You may remember in my last post that I eluded to some issues with the builder. Now that we're moved in and we've officially broken up with said builder (ie: we came to financial resolution and a separation agreement and Waiver of Lien was signed by both parties), I think it's time to share some of the things that ultimately eroded our relationship.
Back in November, Seattle had some torrential rain showers. Rain showers that ended up flooding our basement. I arrived at the house early on Monday morning to find the builder in poor spirits. When I asked him what was going on, he said "There's a little water inside." I almost sharted when I heard the words "water" and "inside" used in the same sentence. Our hardwood floors had just gone in, and I assumed that there was some water coming into the first floor. I was wrong...
As it turns out, the water was pouring into the mechanical room, which is in the basement. I went downstairs to find that the drywall was totally soaked, about 6 feet up on the wall and the water was flowing from one end of the house to the other, much like an overflowing toilet. In a panic, I called my Dad. If you've had the pleasure of meeting my Dad, you know that he can do anything. He has almost every tool known to man, and if you have a problem, he can most likely fix it. He came right over (the perk of having parental units that live 1 mile away) and immediately took a hand saw to the drywall. Here's what we found:
I think it's safe to say that one doesn't need a degree in construction management to know that we had a big problem. Our builder proceeded to run around like a moron, neglecting (this will be a key term in this whole debacle) to make contact with the excavation company who poured the foundation and placed the drains that penetrated said foundation. Instead, it was me, the homeowner, who stood on our front porch and started making calls. Within 10 minutes, I had the owner of the excavation company on the phone and they were sending someone out to take a look.
Back in November, Seattle had some torrential rain showers. Rain showers that ended up flooding our basement. I arrived at the house early on Monday morning to find the builder in poor spirits. When I asked him what was going on, he said "There's a little water inside." I almost sharted when I heard the words "water" and "inside" used in the same sentence. Our hardwood floors had just gone in, and I assumed that there was some water coming into the first floor. I was wrong...
As it turns out, the water was pouring into the mechanical room, which is in the basement. I went downstairs to find that the drywall was totally soaked, about 6 feet up on the wall and the water was flowing from one end of the house to the other, much like an overflowing toilet. In a panic, I called my Dad. If you've had the pleasure of meeting my Dad, you know that he can do anything. He has almost every tool known to man, and if you have a problem, he can most likely fix it. He came right over (the perk of having parental units that live 1 mile away) and immediately took a hand saw to the drywall. Here's what we found:
| Water, pouring down the walls of the foundation. A foundation should NEVER look like this. You can shart now. I did. |
| The concrete just underneath the black tube is dry. Everything else is wet. |
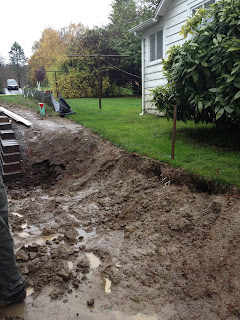
Meanwhile, the dirt on the exterior of the house that had been sinking for several weeks (note: our builder said "that's just typical settling") had completely opened up into a sink hole.
| Water adjacent to the foundation - this was just the beginning of our problem |
| The sideyard eroding before our eyes. If you look closely, you may be able to see the water pouring out of the dirt, just below the wooden stake adjacent to the large shrub. |
| The temporary drain that my Dad and I rigged up to divert water into the driveway. Note: the builder had nothing to do with this manual labor. Thanks. |
While waiting for the excavation company to come and assess the damage, we learned two important things
- The builder neglected (there's that word again!) to put in appropriate drains on the side of the house when the dirt was open during excavation. In other words, despite being on a hill and a well shown on the documents of the property provided to us by the city planner, our builder did nothing. All of the water from the torrential rain, coming down the hill and the water bubbling up from the existing well was pouring into our basement, because the builder didn't tie any drains into the storm sewer during excavation. The existing storm sewer sits just underneath the black drain that we ran down the driveway
- The excavation company never sealed the pipe that penetrated the foundation with cement grout. That's a HUGE problem. Naturally, any water that sits adjacent to the foundation will seep through an unsealed penetration. That's why we had water pouring down the wall of the foundation around the pipe. You might be wondering if the excavation company took any responsibility for this: they didn't. Neither did the builder.
After discovering these 2 very important facts, we realized that we had to solve the problem ourselves. We rented 2 commercial grade pumps and pumped out the hole every 4 hours over Thanksgiving weekend. This allowed us to mitigate any further damage to the basement by keeping water away from the foundation. We also put in that black, temporary drain to divert water away from the house. One of my most vivid memories was mixing cement grout in the basement with my Dad, in a plastic Happy Meal bucket, by flashlight. Listen readers, I'm not a girly girl. While I don't mind getting dressed up, I'm much more comfortable in a pair of jeans or in this case: rubber boots and a headlamp. I'm perfectly capable of mixing up cement grout in a dark basement, but for me it's the principle that the builder was nowhere to be found - and this was a crisis.
Thankfully, we have a dear friend, Bernard Finney of Lawnscapes who came to our rescue. Our family has known Bernard since 1989 when we moved to Seattle, and I can personally attest to the quality of his work and his character. Bernard came out with a crew of guys over Thanksgiving weekend (who does that?) and worked through the storm to install a French drain. Basically, Bernard saved our rear end (and our basement!). Thank you Bernard.
You might also recall the installation of our retaining wall. Bernard and his crew put that in, by hand. If you need an honest, personable and knowledgeable landscaper in the Seattle area, please visit Lawnscapes and give Bernard a call. I promise you won't be sorry!
Now let's get back to the flooding in the basement. Once the French drain was installed, we were able to dry the basement out. Here's a picture of the wall after the cement grout was installed:
| After cement grout installation - see the difference? |
Thankfully our flooring was not installed at the time of the flood - otherwise fixing this problem would have been even more expensive and would have required replacement of vinyl, cork and carpet flooring.
In my next post, I'll talk a bit about the cabinet debacle and the fact that our builder was pocketing money for himself and underpaying the subcontractors.
Monday, March 11, 2013
Progress update - we're in the house!
We've officially moved into the house. The excitement of being in our beautiful, new house has been somewhat overshadowed by some issues with our builder. I will definitely be back when I'm in a better frame of mind and can put forth the time writing about wrapping up this experience.
As always, thanks for reading!
Sunday, February 17, 2013
Progress photos - appliances, lighting & plumbing
Our appliances were delivered and they look great! If you're in the Seattle area, I would strongly recommend purchasing your appliances through Albert Lee. Not only did they help us select the appropriate appliances for our space and needs, but they also provided a new range when the first one we received failed to ignite the bake function on the oven.
All of the appliances that we purchased are Kitchen Aid, with the exception of the vent hood, which is Vent-A-Hood. Since our city has a requirement of installing make up HVAC ventilation for vent hoods over 300CFM, we looked to Albert Lee to find us a hood that met the requirements. The particular model that we picked is 250CFM, eliminating the need for rework on the ventilation in our house - a good thing, after we hemorrhaged some funds to get the cabinets into finished condition.
Our plumber also came and did his final trim out. We're really thrilled with the way that the fixtures look.
Our electrician also dropped by to install the light fixtures. Unfortunately, several of the light fixtures had broken shades. We're still awaiting their replacements, so I don't have a full set of lighting photos. These pictures will give you the general idea of the style that we selected. Classic, restoration style.
All of the appliances that we purchased are Kitchen Aid, with the exception of the vent hood, which is Vent-A-Hood. Since our city has a requirement of installing make up HVAC ventilation for vent hoods over 300CFM, we looked to Albert Lee to find us a hood that met the requirements. The particular model that we picked is 250CFM, eliminating the need for rework on the ventilation in our house - a good thing, after we hemorrhaged some funds to get the cabinets into finished condition.
![]() |
| Kitchen Aid dishwasher |
![]() |
| Kitchen Aid 5 burner gas range with Vent-A-Hood vent hood |
![]() |
| Kitchen Aid microwave & wall oven combo |
![]() |
| Kitchen Aid fridge |
![]() |
| Master shower with frameless shower glass |
![]() |
| Master vanity - one of the sconce shades broke and we're waiting on a replacement |
![]() |
| Kohler Bancroft Monoblock lavatory faucets in the master bath |
![]() |
| Kohler Bancroft Monoblock lavatory faucet with Pental Alpine Quartz in the powder room |
![]() |
| Moen prep sink faucet with Kohler cast iron undermount sink |
![]() |
| Kichler 8 inch Retro Mini Pendants above the island and an $80 drum pendant from Overstock above the dining area |
![]() |
| Foyer pendant by Rejuvenation |
![]() |
| Semi flush schoolhouse style light by World Imports in the transitional space between master bedroom and master bath |
Once I have pictures of all of the lights in the house, I'll be doing a separate post on which lights we chose and why. Stay tuned!
Progress photos - interior painting
We've made lots of progress on the house over the past 3-4 weeks. Our painter came and finished up the interior. It took several weeks and then we had some issues with our cabinets (more on that in a moment).
In writing this blog, I've been careful not to complain or focus on the negatives of building a custom home (and trust me, there have been many moments where I've wondered what we've gotten ourselves into). Yet there's one issue that we couldn't ignore: the cabinets. We used a custom cabinet maker that our builder had used before. He strongly recommended and vetted his work. With this suggestion, we trusted our builder. But let me make a very important statement:
Aside from the cabinet debacle, the rest of the interior painting went really well.
After the cabinets were repainted, and installed for the second time, we noticed that many of the doors were warped. You might be wondering whether or not the repainting of the cabinets caused the warping. Here's what I can tell you: we have stained cabinets in the guest bathroom that were also severely warped. These doors were delivered in that condition and were never removed or retouched.
As you can see below, I marked all of the doors with blue tape. When we threatened to withhold payment from incommunicado weirdo cabinet maker, he was suddenly willing and able to rectify the cabinet situation. We now have new doors that are ready to be installed by our finish carpenter. Suffice to say, it's amazing that I didn't end up committed after dealing with this particular guy.
The painters spent several days prepping the area with masking, paper and diligently covering the flooring and windows.
| Great room built in bookshelf |
| View of the kitchen from the great room |
| Foyer dormer |
| Prepping the box newels |
If your gut is telling you that a particular subcontractor is sort of a weirdo, don't discount that.
Had I trusted my gut, instead of our builder, we would have been in much better shape with cabinetry and our budget. I'm still kicking myself for not trusting my gut, as I always do, but it is what it is...
Our cabinets were delivered and according to our contract, they were supposed to be "painted, finish grade." What we received were cabinets with wood showing through what appeared to be primer. After many weeks of the cabinet guy being incommunicado, we felt as though we had no other choice but to hire our painter to remove all of the cabinet doors and drawers, and spray them into finished grade. If you're wondering, it was approximately $4,000 to have all of our cabinets repainted.
| Cabinets stacked in the garage |
| Bare wood = not good |
| Great room fireplace |
| Great room |
| Interior doors |
| Master bedroom fireplace |
As you can see below, I marked all of the doors with blue tape. When we threatened to withhold payment from incommunicado weirdo cabinet maker, he was suddenly willing and able to rectify the cabinet situation. We now have new doors that are ready to be installed by our finish carpenter. Suffice to say, it's amazing that I didn't end up committed after dealing with this particular guy.
| Mud room |
| Desk in the kitchen |
| Vent hood installed, and it barely fit. |
| Looking at the kitchen from the great room |
| Office doors |
| Powder room |
| Box newels |
| Staircase into the basement |
Wednesday, February 13, 2013
Progress photos - carpet installation
The carpet is in, and it looks great! Initially when we had selected carpet with our designer, she suggested Tuftex by Shaw. Since our carpet guy had a tough time getting the Tuftex carpet, we began looking at other options. Enter the Lexmark Residential Collection. I had never heard of Lexmark Carpet, but after doing some research, it turns out that they just entered the residential market, with a long history of providing carpet in "hospitality" environments (ie: Marriott).
I spoke with the local vendor and he said after a long career in the carpet industry, he does feel as though Lexmark is making a good residential product. Of course he's biased, as he currently works for Lexmark, but push came to shove and we needed to make a decision. I ended up selecting the Lexmark Sterling carpet in 329 Antique Beige. Here are the things that I liked about this particular carpet:
- You can't feel the backing through the nap.
- Some of the loops are looped and others are not. That means that if our carpet ever gets snagged, all I have to do is take a pair of small scissors and trim it out. This particular product seemed to be the best of both plush and berber carpets.
- It feels good when you stand on it.
- Comes in a wide variety of colors.
| Lexmark Sterling Carpet |
| Lexmark Sterling Carpet color samples |
| Lexmark Carpet 329 Antique Beige |
One of the best tips that I can give you is to check the dye lot of your carpet. Since your carpet guys will inevitably have to place seams, it's really important that all of the rolls coordinate with one another. The last thing you want is to have your carpet installed and realize that there's a slight difference in each roll.
| Roll of Lexmark Sterling Carpet |
| Carpet pad |
| Stainmaster carpet pad |
| Carpet padding and tack strip |
| Nailing the pad down to the subfloor |
| Trimming the carpet to fit |
| The transition between the carpet and master bath - if you look closely, you can see the rain showerhead |
| Beautifully installed Lexmark Sterling carpet |
| Carpet going down the stairs into the basement |
Now that the carpet is in, I can honestly say that I'm glad we went with Lexmark. It feels good to walk on, has a nice variation of texture and as the carpet guy who installed it (with 31 years under his belt) said: "This is good carpet!"
Subscribe to:
Posts (Atom)