Sunday, September 30, 2012

Design Inspiration - 50 Shades of Gray, or "How to go insane trying to pick the perfect shade of gray for the exterior of your house."

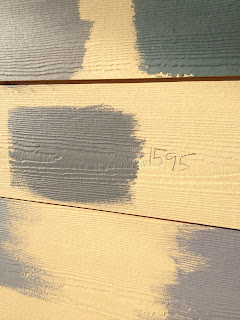
You may remember that we had our heart set on Benjamin Moore Boothbay Gray for our exterior.  This weekend we spent most of our time splashing various shades of gray up on the house.  As it turns out, Boothbay Gray ended up looking more like this terrible house in Berkeley that we used to pass every time my Mom took me to the allergist periwinkle than "coastal gray." 

We went to the paint store no fewer than 10 times and ended up putting more shades of gray on the house than I ever wanted to see.  I'm not a designer and I have no formal training in color, but I know what I like and what I don't like.  It seemed that every gray that we tested looked either too blue or too brown.

I called my aunt, picked the brain of my friend who has extensive knowledge of color and we even rang the doorbell of a home just up the street that looks like it was imported from the coast of Maine.  Thankfully, the owner of the beautiful coastal style home didn't think we were total lunatics (or maybe he did, and hid his opinion quite well).  We were able to hold up the Benjamin Moore paint deck to his home and get a really close comparison.

In the end, I think we finally found the perfect shade of gray:

 
Benjamin Moore 1595 Rocky Coast
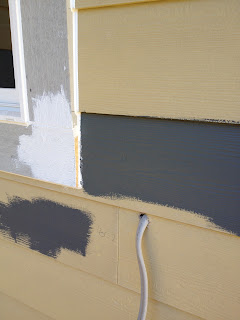
 
Just directly above the wire: Benjamin Moore 1595 Rocky Coast with Benjamin Moore Super White on the window trim


From Benjamin Moore: "Mirroring the color of wave-ravaged rocks along a stormy coastline, this rich, saturated gray confers depth and dimension to any space"

Now here's where it gets confusing: our siding is sort of a buttery yellow color, so any color that we splashed on the side tended to look much different than the color on the paint chip.  In other words, the white balance was getting altered by the siding color, and therefore screwing up with our perception of the actual color. 

I kept looking online for real life exterior swatches of Benjamin Moore and couldn't find any!  With that being said, I'm going to post all of them up so that if someone out there is searching for real life pictures of Benjamin Moore shades of gray, you've come to the right place!  Remember to take each picture with a grain of salt, as it was taken with my iPhone and in various shades of light (morning, full sun, late afternoon, early evening, etc) -and- our siding is that awful butter color, and will totally screw with your perception of color.

Another tip is to splash up the trim color next to the exterior body color, to get a real idea as to what the final product will look like.  Thanks to the Benjamin Moore dude (who was probably sick of seeing my mug), as he suggested that I try the paint with the crisp, white trim to get a better idea as what the color will actually look when it's all said and done. 

Benjamin Moore HC-162 Brewster Gray.  Looking much more periwinkle than we had thought.

Benjamin Moore Super White on the window trim, Benjamin Moore 1595 Rocky Coast above the wire and Benjamin Moore 1602 Gunmetal on the bottom left

Benjamin Moore 1595 Rocky Coast

Benjamin Moore HC-160 Knoxville Gray, looking very teal

Benjamin Moore HC-167 Amherst Gray.  I loved this color, while my husband thought that it looked too taupe.

Benjamin Moore HC-168 Chelsea Gray.  I also liked this one, but my husband thought it was too muddy.
Starting to feel slightly overwhelmed.
Needing a margarita and starting to question my sanity...
 
A few final thoughts:
  1. I am not at all associated with Benjamin Moore.  I just love their paint, particularly the Historical Collection.  I've painted almost 10 rooms with Benjamin Moore paint and can personally attest to the quality of paint.  It's rich in color, goes on well and holds up over years of sunlight and exposure. 
  2. No, I have not read "50 Shades of Grey," and have no plans to.

Progress photos - gas main connection & garage slab

Last week we connected to the gas main and the garage slab was poured.  Thankfully both events went pretty seamlessly with the exception of tearing out the grass strip adjacent to the neighbor's driveway, across the street.  I'd be lying if I said that the process of connecting to the gas main didn't make me a little bit nervous.  It was a fascinating process to watch them burrow through the ground, underneath the street at a depth of approximately 5 feet down.  I've always been fascinated by underground work, particularly mining, and this was no exception. 

It just happened that while the gas company was digging underground, the cement truck showed up to pour the garage slab.  The driver of the concrete truck had a pretty tight space to back into, and he managed it beautifully.  The crew laid the rebar, checked the consistency of the mix and started to pour.  If I had my fishing boots in my car, I probably would've jumped in and helped!  Although knowing my luck I'd get caught up on the rebar and face plant into the cement. 

Starting to dig on the other side of the street

Drilling under the street

Laying rebar in the garage
 
Don't let the picture fool you, it was a very tight fit to get the truck in without running over the pile of siding on the other side of the truck.  Well done!
 
First pour, making sure the consistency is just right


This is the point where I wanted to jump in...

...and this is the point where I realized that would be a bad idea!


Kenworth - The World's Best!


Friday, September 28, 2012

Progress photos - siding

Just a quick update with lots of pictures of the siding.  Our Russian siding guy does incredible work and he's even taught me a few catch phrases in Russian.  I can now say yes/no/thanks and a few choice words.  I'm sure my parents are exceptionally proud that I can swear in three languages.  Cпасибо (thanks) for stopping by!
Tar paper wrap, applied to the front of the house

Siding going on to the front of the house

One of my favorite details to the front elevation, the circle window in the master bedroom!

View of the backyard, retaining wall and back siding

Love the gentle curve of the retaining wall, and how the windows are wrapped in white trim

Back window detail - we elected to put the sill on the bottom, for added character

A simple window, trimmed on the north side of the house

Can't believe that the siding guy is doing the entire house by himself!

Beautiful pine tongue and groove detailing on the underside of the master bath

Having recently attended a trauma conference, the fact that our beloved siding guy is up on the scaffolding without a harness makes me nervous!


I'll be back over the weekend with an update on the garage slab, insulation and how to pick an exterior paint color for your home!  

Sunday, September 16, 2012

Progress photos - central vacuum

If you've been following this blog from the beginning, you'll remember the fire sprinkle debacle.  Since we ended up revising the total square footage by eliminating half the basement, we were able to redistribute some funds to cover a central vacuum system. 

While I'm definitely partial to my beloved Dyson, a central vacuum appealed to me for several reasons:

  1. Less exposure to dust and grime.  UC Davis did a study on the benefits of central vacuum systems.  As a long time allergy sufferer, I quickly bought into the benefits of having a central vacuum.  The vacuumed waste will go directly into a big container, mounted in the garage.  Since we have a man door in the garage, we'll be able to carry the waste directly from the garage, out to the trash can that sits on the outside of the house.  This eliminates the need to unlock a canister from my conventional vacuum and carry a dirty canister through the house, dumping who-knows-what throughout the house on my way out to the garbage can. 
  2. Overall cost.  My Dyson Asthma & Allergy vacuum cost well over $400 when I purchased it several years ago.  Since that time, we've gone through one canister and I'm probably way overdue to bring it in for maintenance.  While the upfront cost of a central vac is much higher than a conventional vac, in theory we won't be buying another vacuum ever again. 
  3. Easy to use.  We elected to go with the "Hide-A-Hose" central vacuum system, which eliminates the need to coil the hose after vacuuming.  The vacuum port on each floor of the house contains a 50ft hose which then retracts into the wall/pipe after each use. 
  4. VacPan.  If you've never seen a crumb sweeper before, prepare to fall in love.  The VacPan is a small device, mounted into the cabinets or baseboards.  Flip the switch with your toe and the VacPan sucks up crumbs, dirt, dust and hair right into the garage canister.  Since I'm the world's worst dustpan user, putting in VacPans is a dream come true!  We'll have a VacPan downstairs in the workshop, one in the kitchen, one in the master bath and one in the guest bath.  "Why put one in the bathrooms?," you might be wondering.  One of my colleagues suggested that we put them in to suck up all of the hair that collects on the bathroom floor. As someone who seems to be constantly "Dry Swiffering" the bathroom floors,  his suggestion made complete sense to me.  (DC, if you're reading this, thanks to you and your wife for your thoughtful suggestions and advice!  I'm sure that we'll enjoy the VacPans in the bathroom - such a brilliant idea.)
The central vacuum has been installed and we're getting ready to close up the walls.  Here are a few shots of the vacuum installation so far:
VacPan stock photo.  Hit the switch with your toe to turn it on.
The VacPan port in the kitchen, which sits in our kitchen island.  The installer kindly boxed it in to protect the pipe as we continue work in the kitchen.  Eventually the box will be taken off, once the cabinets are installed.

Hide-A-Hose central vacuum port.  There will be 50 feet of retractable hose sitting in the pipe just below the port.  We'll end up painting the housing the same color as the wall. 

Progress photos - retaining wall

Our landscaper and his crew managed to finish most of the retaining wall, in just one day.  They ended up running short on crushed rock and have one last row to finish up as time and weather allows.  We're thrilled with how the wall looks - both the color and the gentle curve into the staircase.  The lower tier will be filled with grass and the upper tier will be a combination of grass, perennials, annuals, fruit trees, garden beds and decorative rockery. 

Mutual Materials Northwest Blend

View of the retaining wall from the north side of the yard

View of the retaining wall from the south side of the yard

Staircase

Saturday, September 15, 2012

Design Inspiration - kitchen counters

If you've been reading this blog from the beginning, you may remember that I had my heart set on the Lowe's Angel Ash quartz for our kitchen countertops.  It was the perfect blend of taupe/gray, and everything else that I looked at seemed to pale in comparison. 

"Why quartz?"  I want a countertop that's durable, easy to clean, non-porous and heat resistant.

When we got the bids for the Lowe's Angel Ash, I wanted to vomit realized that we would have to look into other options.  Since Sage Surfaces provides the Allen + Roth quartz directly to Lowe's, it's impossible to find it anywhere else.  With that being said, Lowe's charges a premium for that particular product: $75/sq foot installed.  I went to Lowe's, talked with the crotchety countertop lady who should've retired when Reagan was in office sales rep and wasn't able to get anywhere under the $75/sq ft price, not even with the contractor's discount. 

Let's break it down in simpler terms.  We're putting 96 square feet of quartz in our kitchen. 

96 square feet x $75/sq ft = $7,200 JUST FOR THE KITCHEN COUNTERS

We just don't have the budget to stick with the Allen + Roth Angel Ash, so I started to look at other options. 

I ended up finding a quartz by Pental called Riverbank Brushed, and while it's a bit more chunky, I've decided that I love it just as much, if not more than the Angel Ash.  It's definitely more of an organic look, but I think it's going to look beautiful against the white shaker cabinets and the matte subway tile backsplash.  The best part: it's $55/sq ft!

96 square feet x $55/sq ft = $5280 

By using the Pental quartz, we'll save just over $2,000.

Allen + Roth Angel Ash quartz

Pental Riverbank Brushed quartz

Progress photos - siding

The siding is going up, and it looks fantastic!  Our sider (is that what I'm supposed to call him?) is originally from eastern Siberia, just across the river from China.  When he told me he was from far east Russia, I asked if he could see Sarah Palin's house.  That was a definite ice breaker (no pun intended, as apparently it gets really cold in Siberia) and we've had a nice, minimally conversational relationship ever since.  Our sider doesn't converse much.  I suspect it's because he's working by himself.  Apparently all of the other guys that he normally works with are stuck on other jobs and for the moment, he's flying solo. 
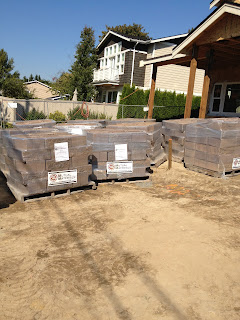
We decided to use HardiePlank Lap Siding, which we've used before on our old house.  We ended up going with an 8 inch plank, to give more of a coastal/bungalow look.  Most homes are sided with 6 inch planks, unless they're homes from the turn of the century, in which case you'll see very narrow or very wide planking. 

Once we decided what material we wanted to use for siding, we had to pick a wrap.  There's lots of information out there about Tyvek wrap versus tar paper.  After a discussion with our builder/sider and some research into what wrap material to use with HardiePlank, we ended up using tar paper.  I'm no expert on the differences between Tyvek and tar paper, but I did read a lot of interesting stuff on Tyvek retaining moisture, with subsequent mold issues.  Obviously Seattle has quite a bit of moisture, so based on our builder's recommendation, we wrapped with tar paper.  Tar paper also happens to be about $500 cheaper than Tyvek. 

HardiePlank 8 inch Lap Siding
So glad we went with the 8 inch plank!  Don't be fooled by the creamy yellow siding and trim.  Eventually the house will be painted with Benjamin Moore HC-165 Boothbay Gray and a crisp white on the trim (exact color TBD).


A penny for good luck!

I found a little surprise, tucked in between the garage and the foyer.  Someone nailed a penny into the framing.  When pressed, all of the framers denied it.  We still don't know who put the penny into our house, but I love knowing that it's there.  Hopefully our family will have many healthy, happy years to come!

Selecting a garage door


We finally picked a garage door!  After receiving several bids and talking to several companies, we ended up selecting the Therma Classic R006S 2-car steel door.  My husband selected the garage door opener: a belt driven, side mount opener.  Our friends have a similar opener and you can barely hear it - something that was really important to us, as the master bedroom is directly above the garage. 

We did have a slight issue with the garage door.  The opening was originally framed to 8', but we had a glulam beam on the garage ceiling that just happened to be encroaching on the vertical space.  After much discussion with the builder and the garage door guy, we decided to have the framer decrease the opening to 7'. 

From Northwest Door's website:

CONSTRUCTION: The Therma Classic is made from hot dipped galvanized wood grain textured steel skins that are embossed with raised panel designs then sandwiched with a polystyrene core. This type of construction forms a thermal barrier between front and back of door. 20 Ga. steel backer plates are toggle locked to the inside of the back skin prior to assembly. Exterior skins are secured to a polystyrene core with Urethane adhesive, a method of construction that is unparalleled in strength. Therma Classic doors are available in 2 design series. The S Series doors have multiple vertical panels embossed to form the various designs. The R Series doors start with 40" x 24" embossed recessed panels. Then roll formed pre painted wood grain textured aluminum design elements are mechanically attached as well as bonded to the face of the recessed panels to form a multitude of designs.
NOMINAL SPECIFICATIONS:
  • Section Joint: Tongue and Groove joint between sections with thermal break
  • Thickness: 2"
  • R Value = 9 (Calculated door section R Value in accordance with DASMA-163)
  • Finish: Baked on polyester enamel
  • Colors selection: White
  • Bottom weather seal: U-shape loop type vinyl with aluminum retainer
  • Limited Lifetime Warranty
STANDARD WIDTHS: 8'-0", 9'-0", 10'-0", 16'-0", 18'-0", 20'-0"
STANDARD HEIGHTS: 7'-0", 8'-0", 9'-0", 10'-0", 12'-0", 14'-0"
Sections available in 27", 28", 31" and 32" in height
OPTIONS:
  • Widths up to 20' in one inch increments, heights up to 14'
  • 1/8" clear annealed glass standard, clear obscure and insulated glass optional.
  • Decorative hardware
  • 25,000, 50,000 & 100,000 cycle torsion springs
  • Low clearance, high lift and vertical lift track and hardware
HARDWARE: 15" or 20" radius torsion hardware; track is 2" bracket mounted. Quiet long life nylon rollers, non-corrosive door fixtures and graduated hinges are standard. U-shaped galvanized struts are supplied with every double car door to keep the door rigid.
AVAILABLE COLORS*:
Bright White
* The actual color may slightly vary from what you are seeing, depending on the color calibration of your computer monitor

This door is very similar to the one we picked, with shaker style panels and 2x3 window grids to match the front door.

Friday, September 14, 2012

Progress photos - backyard

It's been a while since I've updated, but we've made lots of great progress at our house.  We met with our landscaper and devised a plan for the backyard.  Since there's an elevation change of approximately 4 feet, between the front and back of the lot, we had to get creative in maximizing the usability of the backyard. 

While I would've loved to have a completely flat backyard, I also know that there are so many ways to make a tiered yard beautiful.  We just happened to attend a wedding last weekend where the garden of the home was built into a hillside.  I took lots of pictures and collected lots of great ideas - everything from stone work to the contrasting color between groundcover and shrubbery.  (A note to the bride & groom: if you're reading this: Congratulations!  We love you!)

I've known our landscaper for 20 years, so I can personally attest to the quality of his work.  One of the things that he included in his bid was the placement of drains throughout the backyard.  If you're thinking of creating a tiered yard, I can't encourage you enough to make sure that your landscaper is familiar with drainage patterns and knows how to install the appropriate drains for the landscape.  Since the backyard slopes into the house, it's really important to make sure that the yard is well drained so that we don't have an issue with flooding.

We decided to use rockery from Mutual Materials.  While I would've loved having a natural stone (ie: boulders) for the retaining wall, it was cost prohibitive and our landscaper felt as though the large stones wouldn't necessarily stand the test of time.  After looking through the color selections, we decided to use the Mutual Materials flat faced Manor Stone in "Northwest Blend." 

Wanna know how much stone was delivered to our property?  32,000 lbs.  Here's another crazy factoid: our landscaper and his crew of guys are moving all of the rockery by hand.  In his words: "They built the pyramids by hand!"  Very true, my friend...
A huge pile of crushed rock - we'll use this to surround the drains and the retaining wall

32,000 lbs of rockery

Mutual Materials flat faced Manor Stone in "Northwest Blend." 

The stairs that our landscaper hand cut into the backyard.  The pile of dirt at the top will be used to backfill the retaining wall, and then the top tier of the yard will be graded evenly.

Love the use of boulders in landscaping beds!

Beautifully landscaped beds near our local shopping center

A great example of how to beautifully tier a backyard


Love the contrast of colors!


Another beautifully landscaped perennial bed